
This post may contain affiliate links, which means if you purchase from one of these links I will receive a commission. Please read my full privacy policy for more information.

As bloggers, our to-do list is never ending! There are always blog posts to write, social media images to make and website edits. While very important, creating Pinterest images can be time-consuming. I am so excited to share how I save tons of time and money by using Google Slides to make my Pinterest Images.
I enjoy making templates, to speed up my content creation process. My favorite and most used template is my blog post template.
The most recent idea I have been playing around with is using Google Slides to create Pinterest images. If you are like me, you most likely have been using Canva or PicMonkey.
While both are great tools (that I still occasionally use), they are paid for services if you want to take advantage of the template and branding features. They have their limitations when editing text and adding images. Plus, it’s just one more tool you have to add to your toolbox.
With Google Slides, you can create Pinterest templates, using your style and branding for free. It has more functionality while still keeping the important features Canva and Picmonkey. Plus as bloggers, Google Drive is a tool we are already using! Using fewer tools and keeping everything in one place makes you more efficient and organized.
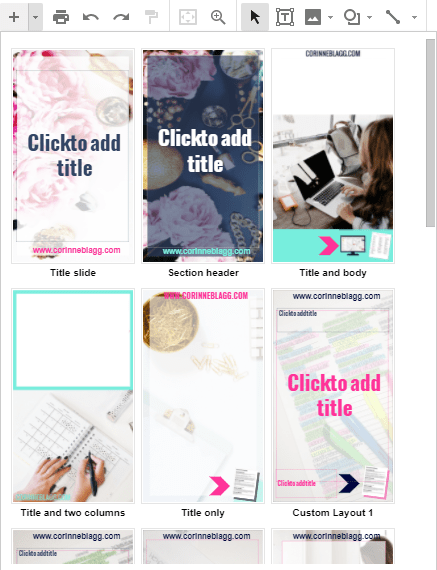
Here is a picture of my templates in Google Slides:
Pro tip: One of the best features is adding a shadow to those pretty printables or fee opt-ins we like to highlight in our pins!
How to Create Pinterest Templates in Google Slides
If you rather following along with a video click here for the video tutorial.
Step 1
Once in Google Drive, go to the new button on the left-hand side and pick Google Slides –> Blank Presentation
We are going to make it a template at the end.

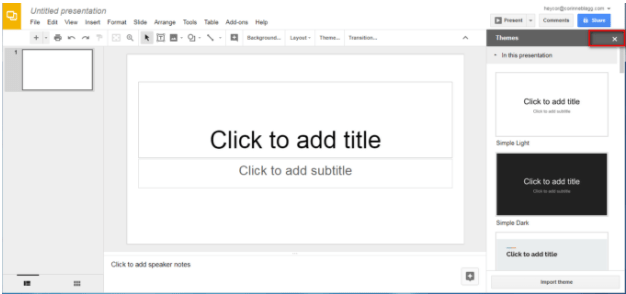
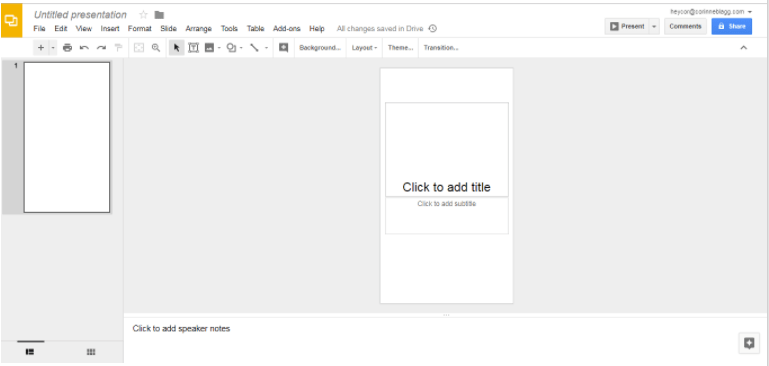
Step 2
When you first open your new presentation it will look like this. Just click the “X” and close the themes, we don’t need those.
Step 3
Next, we are going to resize the presentation to be the right size for Pinterest.
File –> Page Setup –> Custom
Click on inches and change it to Pixels. Then pick your preferred pixel size for Pinterest. I like 735 X 1300. Your presentation should look like this long image.
Step 4
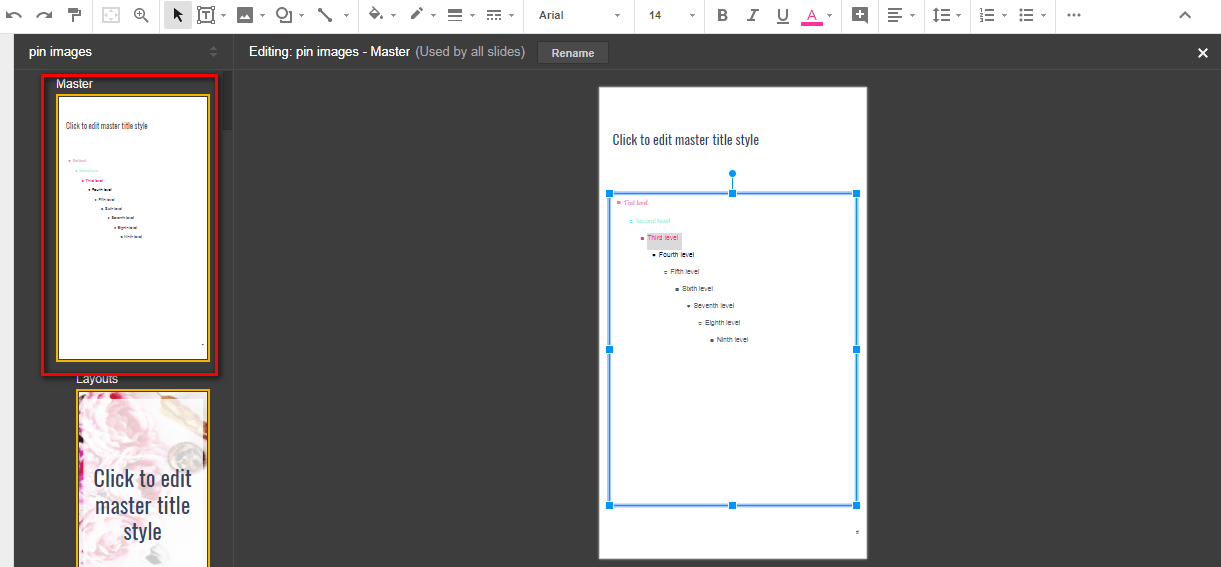
To start making your templates go to View –>Master. This takes you to the master theme of your slide presentation. Click on the master slide on the left (I highlighted it in red below to help you find it).
Change the text to your fonts and colors. This makes the whole theme of the slide presentation match your branding.
Step 5
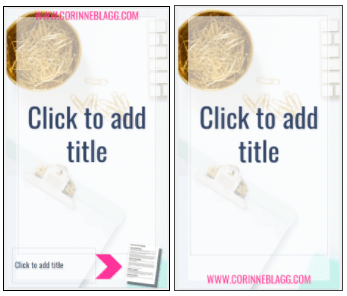
Now just start either building your pins from scratch by adding the background and text. Or you can take your popular pins, add them to the presentation and just block out the text to make a whole new pin. See the progression below.

Step 6
Get creative, make variations of the same pin. The more work you do now the more time you will save later. Here are some ideas. I have one pin with an Opt-in and arrow and one without. This way I have a pin ready for any type of blog post. You could also make the same layout but just use different colors.
Step 7
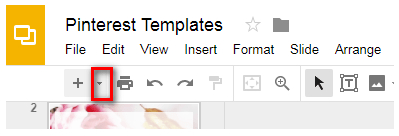
When you are done making all of your templates go to View –>Master. You will now be able to make your images unique without impacting the templates. To pick one of your templates, click the little arrow next to the plus sign. All of your available templates will show, just pick the one you want.
Step 8
To save your pins as images just go to File –>Download As –> jpeg or png

Extra Pro Tips on Google Slides
If you use your phone to take a lot of pictures for your blog, you can backup your photos to Google Photos. You can import your pin images from Google photos, so you now have all of those pictures right at your fingertips.
Get creative, by just zooming in on an image it can become something completely new! Add any overlays you frequently use too. Everything except the text.
To change the transparency of your overlays you click on custom and move the little toggle up and down.

To add your brand colors you also click on custom (like above) and enter your color code. You will start to see your colors appear in the boxes.
How to Create a Shadow on Your Opt-in
- Add a picture of the opt-in to your Pinterest image. What I do is open the PDF and take a screen clip of the opt-in to turn it into a png or jpeg.
- Once the opt-in image is in your pin image, right click on it and pick format options. Format options will pop open on the right. Use drop shadow to create the shadow on your image.
That’s it! I hope you find this tutorial helpful and it speeds up the time it takes to create your pinnable images.
Additional Pinterest Resources
The Secret Behind How to Make Money on Pinterest & it will blow your mind!
How I Made $7,000 on Autopilot with Pinterest in 3 Months
10 Easy Fixes To Increase Blog Traffic Fast With Pinterest
About the Author
Corinne Blagg
| Corinne considers herself a productivity and efficiency geek! She enjoys finding better, faster or easy ways to do things. She started her blog to help other overwhelmed mom bloggers be more productive in their business.
She is a mother of one very “spirited” little girl. She works full time (a full 40 hours) for a large corporate company from home and runs this blog part-time. She lives in VT where she is currently working towards building a homestead and creating a more intentional lifestyle with her husband. Needless to say, she is always looking for ways to be more efficient and reduce the amount of time it takes to accomplish her blogging tasks. She experiments with new ideas and shares them on her blog if they are a success! She loves automation and her signature course teaches bloggers how to effectively create content to become more consistent bloggers. You can find Corinne on her website CorinneBlagg.com. |
 |
Pin it!
Hi Corrinne,
I love using Google Drive for everything! This is definitely not an application that I have considered before, but I’m testing it out now to see if it will help save me some time creating pins for each blog post.
Thank you for sharing!
This is such a great tutorial! I never would have thought about using Google Slides for Pinterest pins. I typically use Canva. I’ll have to give this a try.
What a cool feature. I never knew! I’ll have to share this in my FB group and try it out myself! Thanks Corinne.
Loving this great tip using Google Slides. I can’t wait to try the shadow element, the key thing missing from Canva. Thanks for sharing!
This is cool! Question, how many templates do you generally have? And do you rotate them frequently or typically use the same ones?
Also, just fyi that the video demo didn’t link, nor did your blog post template, I was hoping for that one ;). Thanks for the ideas here!!